
Introduction to API Endpoint Development
Understanding API Endpoints
API endpoints serve as the communicative bridges between different software applications, allowing them to share data and functionality seamlessly. Think of an API endpoint as a waiting room for requests—when one application (the client) has a question or needs something from another (the server), it sends an HTTP request to the appropriate endpoint. The server then processes this request and returns an appropriate response. For example, consider a weather application fetching data from a weather service. The client sends a request to the specific endpoint that retrieves current weather conditions, and the server responds with the necessary data.
Benefits of Using Java Spring Boot
When it comes to building these API endpoints, Java Spring Boot stands out as a popular framework. Here’s why many developers are turning to Spring Boot for their API development needs:
- Rapid Development: With its convention over configuration principle, developers can quickly set up new projects.
- Embedded Server: Spring Boot includes an embedded server, allowing for easier deployment and testing without additional setup overhead.
- Community Support: Being a widely used framework, Spring Boot has a robust community, offering extensive resources and plugins.
- Ease of Integration: It effortlessly integrates with other tools and systems, whether you're looking to connect a database or a microservice.
Ultimately, using Java Spring Boot simplifies the process of creating, maintaining, and scaling API endpoints, giving developers the tools they need to focus on writing effective code rather than getting bogged down by configuration issues.

Setting up Development Environment
Installing Java Development Kit (JDK)
Before diving into API development with Spring Boot, the first step is to install the Java Development Kit (JDK). The JDK is essential as it provides the necessary tools, libraries, and the Java runtime environment needed to develop Java applications. Here’s a simple way to ensure a smooth installation:
- Download JDK: Visit Oracle’s official website or OpenJDK’s site to download the latest version of JDK.
- Install: Follow the installation wizard prompts. Make sure to note the installation directory, as you may need it for configuring environment variables later.
- Set Environment Variables(for Windows users):
- Open System Properties > Advanced > Environment Variables.
- Add a new variable named
JAVA_HOMEpointing to your JDK installation path. - Update the
Pathvariable by adding a new entry:%JAVA_HOME%\bin.
Installing IntelliJ IDEA
With the JDK in place, it’s time to set up your Integrated Development Environment (IDE). IntelliJ IDEA is a favorite among developers for its user-friendly interface and powerful features. To install IntelliJ IDEA:
- Download the Installer: Head to JetBrains' official website and download the community edition (free) or choose the ultimate edition if you need advanced features.
- Run the Installer: Follow the guided installation steps. It usually involves choosing directory settings and agreeing to terms.
- Start a New Project: Once installed, launch IntelliJ IDEA and create a new project. Your first encounter might feel overwhelming, but take your time exploring the layout.
Setting up this development environment ensures that you have the right tools at your fingertips, allowing you to focus on creating robust API endpoints with Java Spring Boot. With everything in place, you’re all set for the next steps in the development journey!

Creating a New Spring Boot Project
Using Spring Initializr
Now that the development environment is set up, it’s time to create a new Spring Boot project. Luckily, Spring Initializr simplifies this process significantly. This web-based tool allows you to bootstrap a new project quickly with just a few clicks. Here’s how to get started:
- Visit Spring Initializr: Open your browser and head to start.spring.io.
- Configure Your Project:
- Choose the project type (Maven or Gradle).
- Select the language (Java).
- Specify the Spring Boot version you wish to use.
- Enter Project Metadata:
- Fill in your Group (usually a domain name in reverse) and Artifact (project name).
- Set the package name and the project description.
- Generate the Project: Once you've made your selections, click the Generate button. This action downloads a zipped project folder containing a skeleton of your Spring Boot application.
Setting Project Dependencies
As you unzip the project, you'll notice a pom.xml file (if using Maven) or build.gradle (for Gradle). Up next, you’ll want to add specific dependencies that your application requires. A few essential dependencies to consider include:
- Spring Web: For building web applications and REST APIs.
- Spring Data JPA: For database interactions using Java Persistence API.
- Spring Security: If you plan to implement secure endpoints.
To add dependencies:
- For Maven: Add relevant entries in the section of your
pom.xml. - For Gradle: Include them in the
dependenciesblock of yourbuild.gradle.
With the project created and dependencies set, you’re laying a solid foundation for developing powerful and efficient API endpoints in your Spring Boot application!
Defining API Endpoints
Creating Controller Classes
With your Spring Boot project established and dependencies configured, it's time to define your API endpoints. The first task in this process is to create controller classes. Controllers serve as the gatekeepers between incoming HTTP requests and your application’s business logic. To create a controller class in Spring Boot:
- Create a New Class: In your project, navigate to the
src/main/javadirectory, and add a new Java class (e.g.,UserController) within your package structure. - Annotate the Class: Use the
@RestControllerannotation to designate this class as a controller that processes REST API requests.
For example:
@RestController

@RequestMapping("/api/users")

public class UserController {

    // Endpoint methods will go here

}
This sets up a base URL for all endpoints handled by this controller.
Mapping HTTP Requests
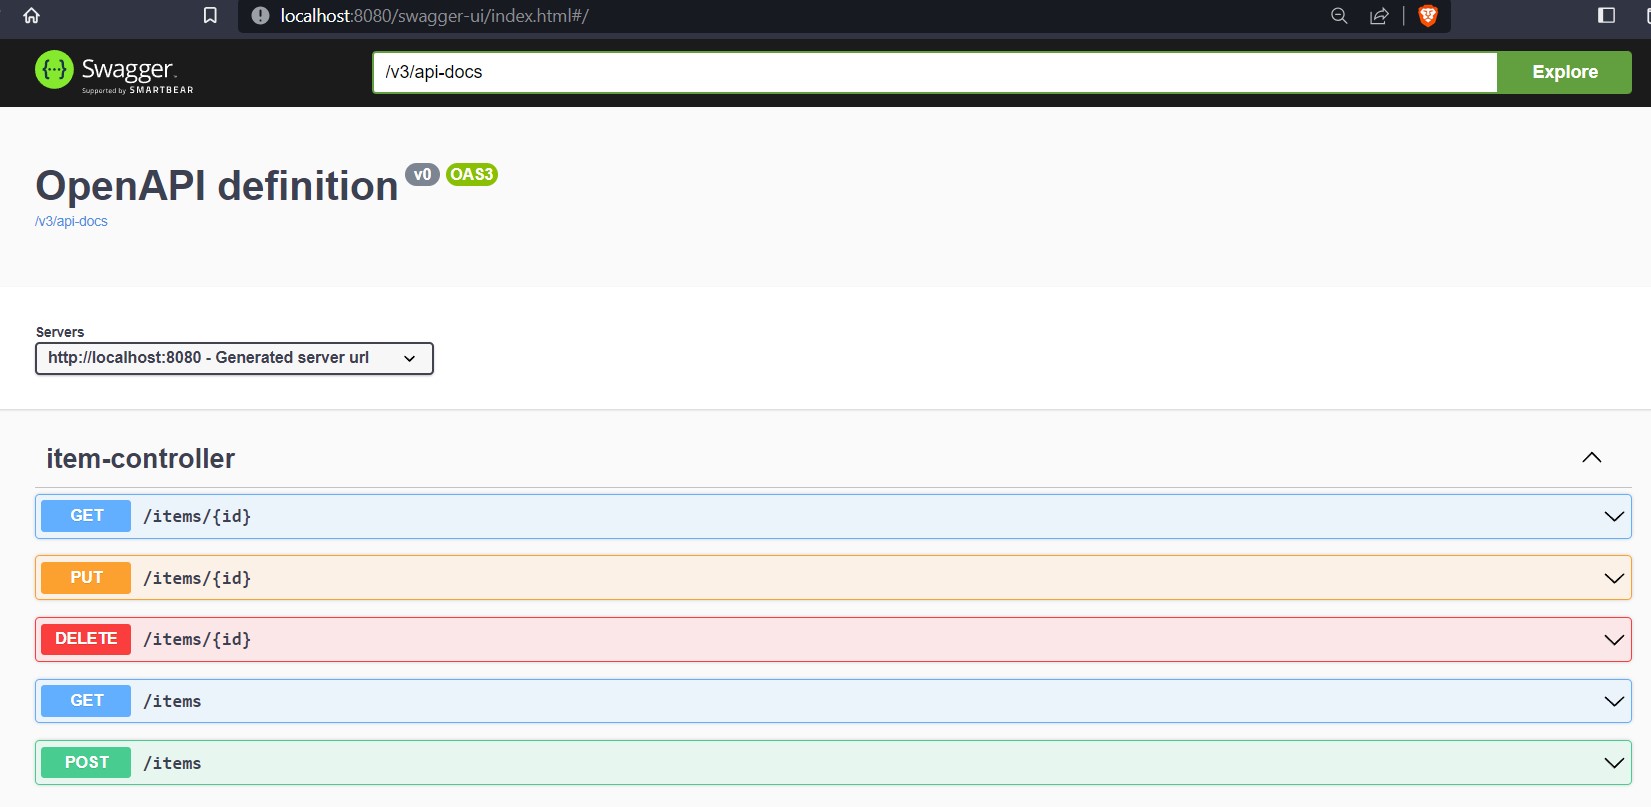
Now that the controller is ready, the next step is to map HTTP requests to specific methods within your controller. This is done using annotations like @GetMapping, @PostMapping, @PutMapping, and @DeleteMapping. Here’s an example of mapping a GET request to retrieve a list of users:
@GetMapping

public List getAllUsers() {

    // Logic to fetch users from the database

}
And if you wanted to allow adding a new user:
@PostMapping

public ResponseEntity createUser(@RequestBody User user) {

    // Logic to save the new user

}
By defining both controller classes and mapping these HTTP requests, you are effectively establishing how your application will interact with clients, making data retrieval and manipulation straightforward. With each method you add, your API becomes more functional and ready to serve user needs!

Implementing Business Logic
Writing Service Classes
With your API endpoints defined, the next step is to implement the business logic that will process data requests. This is where service classes come into play. Service classes act as intermediaries between your controllers and the data layer, encapsulating the core business functionalities. To create a service class:
- Create the Class: Add a new Java class (e.g.,
UserService) in theservicepackage. - Annotate the Class: Use the
@Serviceannotation to indicate that this class provides business services.
In your UserService, methods can be designated to handle user-related operations. For example:
@Service

public class UserService {

    public List fetchAllUsers() {

        // Logic to fetch all users

    }

    public User addUser(User user) {

        // Logic to add a new user

    }

}
By organizing business logic in service classes, you keep your controllers clean and focused solely on handling requests.
Handling Data with Repositories
To interact with data, you'll need to implement repository interfaces, which serve as the bridge to your database. Spring Data JPA simplifies data access using the repository pattern, allowing you to perform CRUD operations without writing extensive SQL.
- Create a Repository Interface: Create an interface, such as
UserRepository, extendingJpaRepository, which provides built-in methods for database interactions.
Example:
@Repository

public interface UserRepository extends JpaRepository {

    // Custom query methods can be defined here

}- Inject the Repository: In your
UserService, use@Autowiredto inject theUserRepositoryand gain access to data manipulation methods:@Autowired private UserRepository userRepository;
By writing service classes and leveraging repositories, you create a clean separation of responsibilities, ensuring your API is both efficient and maintainable. This layered structure enables easy testing and scalability, ultimately supporting a robust application architecture.
Testing API Endpoints
Unit Testing Controllers
With your service classes and repositories in place, it’s crucial to ensure that your API endpoints function correctly. This is where testing comes in, starting with unit testing your controllers. Unit tests focus on validating individual components in isolation, making it easier to catch bugs at an early stage. To get started with unit testing in Spring Boot:
- Set Up Testing Framework: Make sure you include JUnit and Mockito in your
pom.xmlorbuild.gradlefor testing support. - Create Test Class: For your
UserController, create a test class (e.g.,UserControllerTest).
Here’s a simple example:
@RunWith(SpringRunner.class)

@WebMvcTest(UserController.class)

public class UserControllerTest {

    @Autowired

    private MockMvc mockMvc;

    @MockBean

    private UserService userService;

    @Test

    public void testGetAllUsers() throws Exception {

        mockMvc.perform(get("/api/users"))

               .andExpect(status().isOk());

    }

}
Using MockMvc allows you to simulate HTTP requests, ensuring your endpoints respond as expected without starting the entire application.
Integration Testing with Postman
While unit tests verify individual components, integration testing ensures that your entire application works harmoniously. This is where tools like Postman shine, allowing you to manually test API endpoints. To get started with Postman:
- Install Postman: Available for download on Postman’s website.
- Create Your Request: Open Postman and create a new request. Set the request type (GET, POST, etc.) and enter your endpoint URL.
- Send a Request: Click "Send" and observe the response. You can check the status code, response time, and payload returned.
Using Postman also lets you test various scenarios, such as sending invalid data or checking for proper error handling. Integration testing ensures that all components of your API are working together seamlessly. By combining unit tests and tools like Postman, developers can confidently ensure their API endpoints are robust, reliable, and ready for production use. Proper testing not only reduces bugs but also enhances overall code quality!
Securing API Endpoints
Implementing Authentication
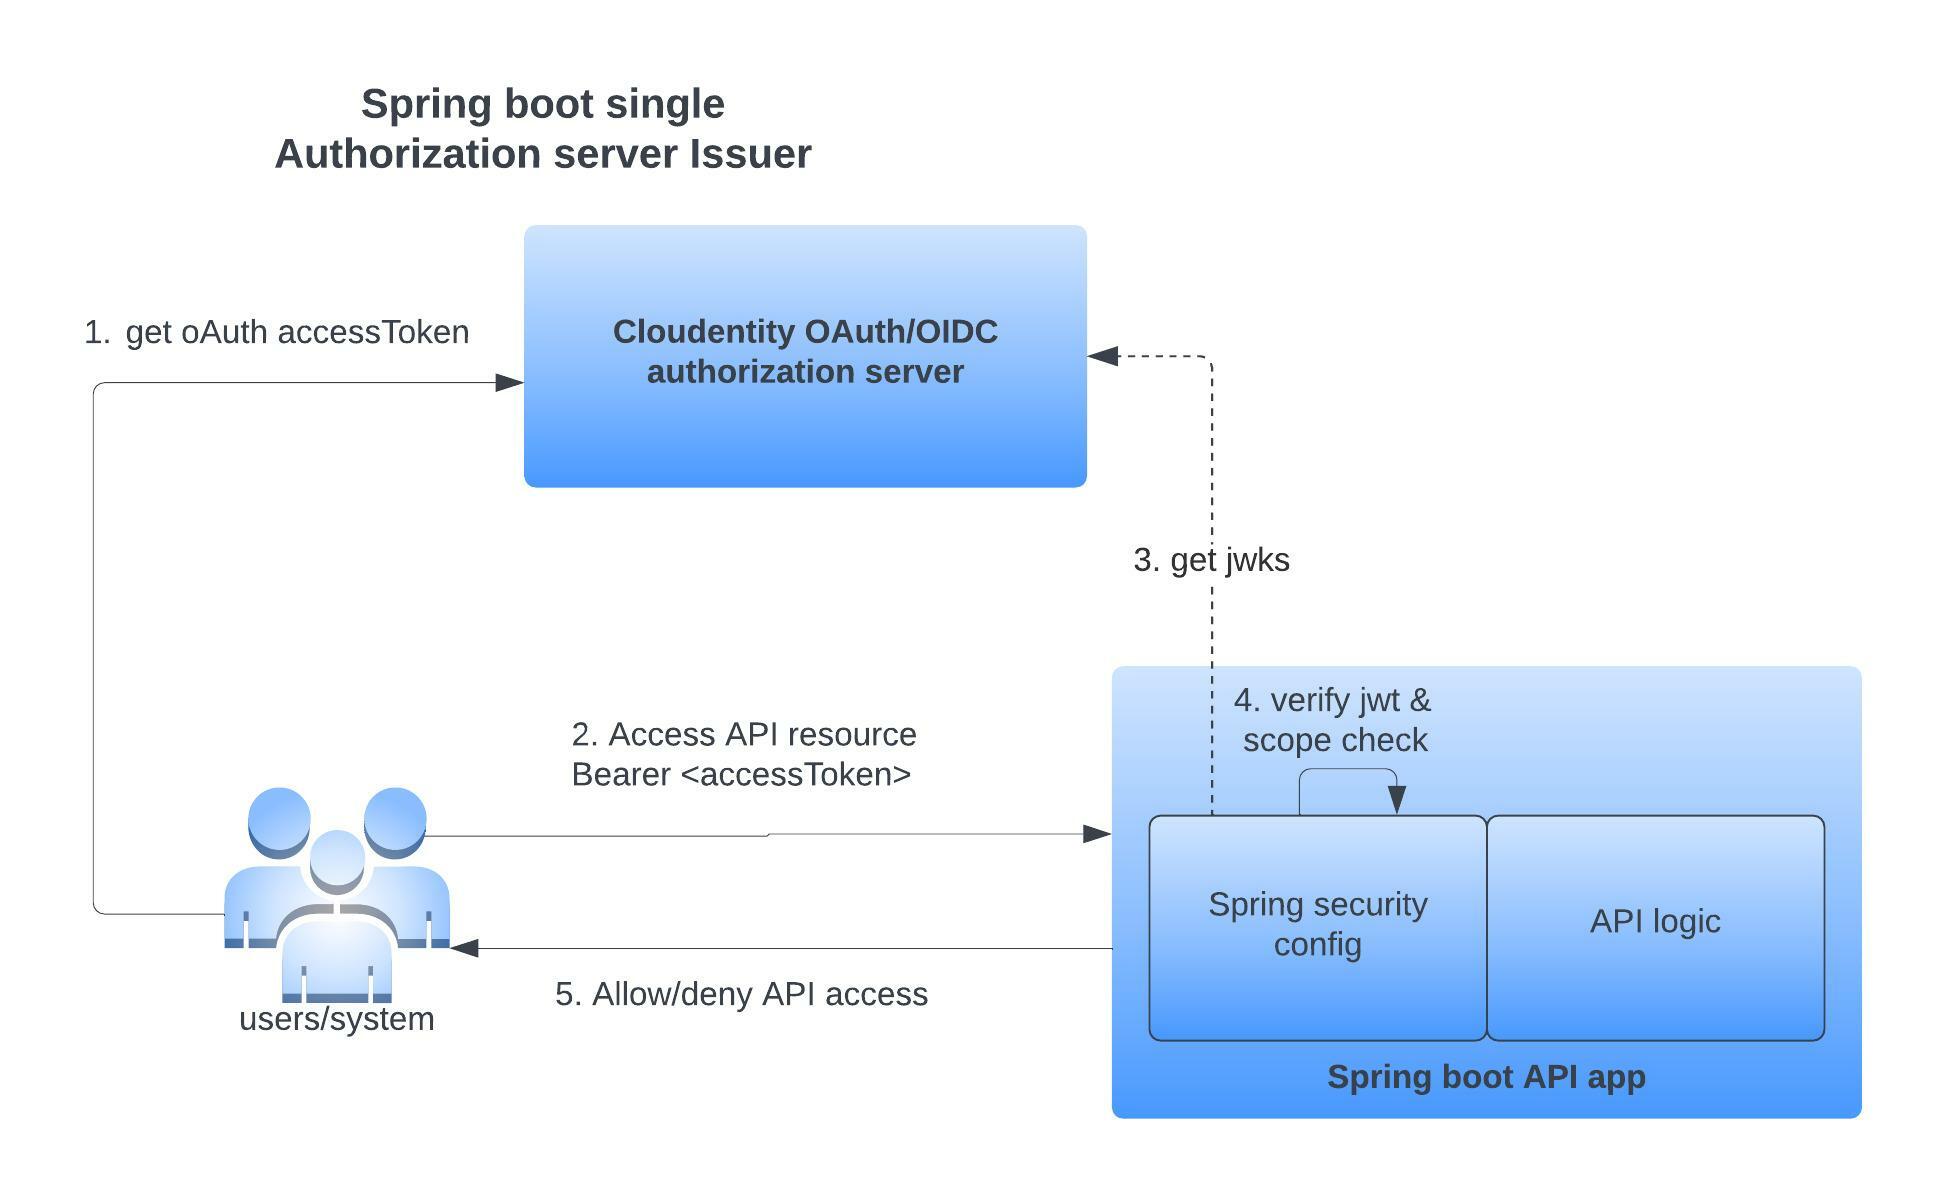
Once your API endpoints are up and running, securing them is paramount. One effective way to achieve this is by implementing authentication. By doing so, you ensure that only authorized users have access to your resources. One common method is using JWT (JSON Web Tokens) for authentication. Here's a quick rundown:
- Set Up Dependencies: Add the necessary Spring Security and JWT libraries to your
pom.xmlorbuild.gradle. - Configure Security: Create a security configuration class using
@EnableWebSecurity. Customize HTTP security to permit or restrict access to certain endpoints based on roles. - Generate Tokens: When a user logs in, generate a JWT token and return it in the response. This token can then be sent in the Authorization header for subsequent requests.
For example, a user might log in and receive a token like this:
{

  "token": "eyJhbGciOiJIUzI1NiIsInR..."

}
Enabling HTTPS with SSL
While authentication guards your API, enabling HTTPS with SSL adds another layer of security by encrypting data in transit. This ensures that sensitive information, such as user credentials or personal data, cannot be easily intercepted. To enable HTTPS in a Spring Boot application:
- Generate an SSL Certificate: You can create a self-signed certificate for development using the Java keytool. For production, consider using a certificate from a reputable Certificate Authority (CA). Example command:
keytool -genkeypair -alias myalias -keyalg RSA -keystore mykeystore.jks -keysize 2048 - Configure Application Properties: In your
application.propertiesorapplication.yml, specify the keystore details:server.port=8443 server.ssl.key-store=classpath:mykeystore.jks server.ssl.key-store-password=mypassword
By implementing authentication and enabling HTTPS, you create a secure gateway for your API, ensuring that both your data and users are protected from unauthorized access and malicious attacks. Taking these security measures not only builds trust with users but also fortifies your application against potential vulnerabilities.
Deploying the API Endpoint
Packaging the Application
With your API secured and ready for users, the next step is deployment. The first phase of this process involves packaging your application into a deployable format. Spring Boot makes this remarkably straightforward.
- Build the Application: Use Maven or Gradle to generate a JAR (Java Archive) or WAR (Web Application Archive) file, depending on your needs. For instance, you can run the following command in your project directory:
mvn clean packageor for Gradle:./gradlew build - Locate the Package: After building, you’ll find the packaged file in the
target(for Maven) orbuild/libs(for Gradle) directory. This file contains all your application code, dependencies, and configuration settings wrapped neatly together.
Deploying to a Server
Once your application is packaged, it’s time to deploy it to a server. There are multiple options for deployment, whether you choose a cloud service like AWS, Azure, or Heroku, or your own virtual or physical server.
- Choose Your Hosting Option: Decide where you’ll host the application. For simplicity, you might start with Heroku or AWS Elastic Beanstalk.
- Upload Your Application: For many cloud platforms:
- Simply drag and drop your JAR or WAR file into their upload interface.
- If you’re using a cloud CLI, you can use commands like
heroku deployoraws deploy.
- Configure Environment Variables: Ensure any necessary configurations, such as database URLs or authentication secrets, are securely set in your server environment.
Deploying your API is the final step before it goes live and is utilized by users. As you go through the deployment process, you might encounter challenges, but each deployment further enhances your understanding of managing applications in the real world. With your API now live, users can finally reap the benefits of the features you’ve worked hard to implement!

Monitoring and Troubleshooting
Logging Best Practices
Once your API is deployed, the work doesn’t stop there—monitoring and troubleshooting are crucial for maintaining its health and performance. A solid logging strategy can help you keep track of what’s happening in your application. To enhance your logging practices:
- Use a Consistent Logging Framework: Spring Boot supports logging frameworks like Logback and SLF4J. Pick one and stick with it throughout your project for consistency.
- Log at Appropriate Levels: Use different log levels (DEBUG, INFO, WARN, ERROR) to differentiate between the severity of messages. For example:
- DEBUG for detailed, low-level messages helpful during development.
- ERROR for issues that need immediate attention.
- Include Contextual Information: When logging, add relevant details like user IDs or request payloads to make it easier to understand the context of any errors.
Implementing these best practices helps you identify issues quickly and understand user behavior better.
Monitoring API Performance
Logging is just one side of the equation; regular performance monitoring is essential for ensuring that your API runs smoothly. Here’s how you can effectively monitor your API performance:
- Use Monitoring Tools: Solutions such as Prometheus, Grafana, or APM tools like New Relic can provide real-time insights into how your API is performing.
- Track Key Metrics:
- Response Times: Measure how long it takes for your API to respond to requests.
- Error Rates: Keep an eye on the frequency of errors to identify trends or underlying problems.
- Throughput: Monitor the number of requests processed over a specific period.
- Set Up Alerts: Configure alerts for critical failures or performance thresholds. For instance, if the response time exceeds a certain limit, you'll want to know about it immediately.
By establishing robust logging practices and performance monitoring, you can preemptively catch issues and provide a seamless experience for your users, ensuring your API remains reliable and efficient over time. Monitoring isn’t just about fixing what’s broken; it’s about continuously improving your API's performance and user satisfaction.

Conclusion and Further Learning
As we wrap up our exploration into API endpoint development with Java Spring Boot, it's evident that the journey—from setting up your development environment to securing and monitoring your API endpoints—offers a wealth of learning opportunities. Each step taken enhances not only your technical skills but also your understanding of how robust applications are built. Throughout this guide, you've learned how to:
- Create and manage RESTful API endpoints.
- Implement essential business logic using service and repository classes.
- Secure your API through authentication and HTTPS.
- Monitor performance and troubleshoot using logging best practices.
Further Learning Opportunities
If you're eager to deepen your knowledge, here are a few pathways you might consider:
- Explore Advanced Spring Features: Delve into Spring Boot’s advanced capabilities, including Spring Cloud for microservices or Spring Security for enhanced protection.
- Learn About Microservices Architecture: Understanding how to build and deploy microservices can significantly enhance your skill set, especially in large-scale applications.
- Participate in Online Communities: Platforms like Stack Overflow, GitHub, and dedicated forums are excellent for questions, discussions, and discovering new resources.
- Take Online Courses: Websites like Udemy, Coursera, or Pluralsight offer comprehensive courses specifically on Spring Boot and API development.
By continually learning and experimenting, you can stay ahead in the ever-evolving landscape of software development. Embrace new challenges, and always be open to refining your skills. Happy coding!
.jpg)
Introduction to the @Transactional Annotation
When working within the Spring framework, developers often encounter scenarios where transactional integrity is crucial for their applications. This is where the @Transactional annotation comes into play, serving as a powerful tool for managing transactions effortlessly.
Purpose of @Transactional Annotation
The primary purpose of the @Transactional annotation is to define the transactional boundaries for a method or a class. By annotating a method with @Transactional, developers ensure that the operations within that method are executed as part of a single transaction. If any part of the transaction fails, the entire operation can be rolled back, maintaining data consistency and integrity. For instance, consider a scenario where you are processing an online order. If your application deducts the payment but fails to update the inventory, it can lead to discrepancies. Utilizing @Transactional ensures that both operations succeed or fail together.
Benefits of Using @Transactional Annotation
Using the @Transactional annotation in your Spring Boot application comes with several benefits:
- Atomicity: It guarantees that a series of operations either fully complete or do not happen at all, which is crucial for maintaining data integrity.
- Declarative Transaction Management: With
@Transactional, developers can define transaction boundaries declaratively, simplifying code while improving readability and maintainability. - Less Error-Prone: By handling transactions automatically, developers reduce the risk of human error that can occur when managing transactions programmatically.
- Flexibility and Configurability: It allows various configuration options such as isolation levels, propagation behaviors, and rollback rules, which can be tailored to specific requirements.
- Improved Performance:
@Transactionalcan enhance performance by minimizing the number of database calls when multiple operations are grouped within a single transaction.
In summary, the @Transactional annotation serves as a fundamental component in Spring Boot for managing transactions effectively. It not only streamlines the development process but also ensures that applications can handle data operations with confidence, providing a robust foundation for building reliable software.

Understanding Transaction Management in Spring Boot
Continuing from our exploration of the @Transactional annotation, it’s essential to understand how transactions are managed in Spring Boot and the various propagation types available. This knowledge enables developers to use transaction management more effectively and tailor it to their application's specific needs.
How Transactions are Managed in Spring Boot
Spring Boot utilizes a robust transaction management system built on top of the Spring framework. Here’s an overview of how transactions are managed:
- Underlying Technologies: Spring handles transactions through its integration with various data access technologies, such as JPA, JDBC, and Hibernate. It provides an abstraction layer that keeps the transaction logic separate from the business logic.
- Transaction Manager: Spring provides different transaction manager implementations (like
JpaTransactionManagerfor JPA,DataSourceTransactionManagerfor JDBC) that facilitate the management of transactions in a Spring Boot application. - Automatic Handling: When a method annotated with
@Transactionalis called, Spring automatically opens a transaction before the method execution and commits it if the method completes successfully. In case of an exception, the transaction is rolled back, ensuring data integrity.
This means that developers can enjoy automatic transaction handling without having to write boilerplate code for managing them manually, fostering a cleaner codebase.
Different Propagation Types in @Transactional Annotation
Understanding transaction propagation types is crucial as it determines how transactions behave in different scenarios. Here are the main propagation types you can use with the @Transactional annotation:
- REQUIRED: This is the default setting. If a transaction exists, the method will join it; if not, it will create a new one.
- REQUIRES_NEW: This type always creates a new transaction. Even if there is an existing transaction, this method will run in a separate transaction context.
- NESTED: It allows a method to run in a nested transaction. If the outer transaction fails, the inner transaction can still roll back or commit separately.
- SUPPORTS: If a transaction exists, it will run within it; if not, it will execute without a transaction.
- MANDATORY: The method must run within an existing transaction; otherwise, an exception will be thrown.
- NEVER: This approach ensures that the method does not run within a transaction, throwing an exception if one exists.
- NOT_SUPPORTED: If there is a transaction, it suspends it and runs the method non-transactionally.
By understanding these propagation types, developers can better control transaction behavior and hierarchy, making it easier to build robust applications in Spring Boot that require careful management of transactional operations.
Working with @Transactional Annotation in Spring Boot
As we delve deeper into the practical use of the @Transactional annotation in Spring Boot, it's vital to grasp both the syntax for implementation and the nuances of nested transactions, including rollback rules. Mastering these aspects can help optimize the transactional behavior of your applications.
Syntax and Configuration Options of @Transactional
The @Transactional annotation can be used in various ways, allowing developers to configure it to their needs. Here’s a basic example of how to use it:
import org.springframework.stereotype.Service;

import org.springframework.transaction.annotation.Transactional;

@Service

public class OrderService {

    @Transactional

    public void placeOrder(Order order) {

        // Save order information

        orderRepository.save(order);

        // Deduct payment

        paymentService.processPayment(order.getPaymentDetails());

        // Update inventory

        inventoryService.updateStock(order.getProductId());

    }

}
In this example, all the operations within the placeOrder method will be managed as a single transaction. If any of them fail, the entire transaction will roll back, which is a significant advantage. Configuration Options:
- Propagation: Configure how the method should behave concerning existing transactions (as discussed earlier).
- Isolation: Set the isolation level for the transaction to define how data read and written by the method is isolated from other transactions.
- Timeout: Specify how long the transaction should wait before timing out.
- ReadOnly: Mark the transaction as read-only if it does not modify the database.
For instance:
@Transactional(propagation = Propagation.REQUIRES_NEW, isolation = Isolation.SERIALIZABLE, timeout = 30, readOnly = false)This allows fine-tuned control over how the transaction operates.
Nested Transactions and Rollback Rules
Nested transactions are a fascinating aspect of transaction management, allowing a transaction to be split into smaller parts. When using the @Transactional annotation, you can manage nested transactions seamlessly. To illustrate, consider the following scenario: Suppose you have a method that processes multiple tasks within a broader operation. If one of these tasks fails, you can roll back only that specific part, leaving other parts intact.
- Key Points:
- Rollback Rules: By default, only unchecked exceptions cause a rollback. You can customize this using the
rollbackForattribute of the annotation to specify which exceptions should trigger a rollback.
@Transactional(rollbackFor = { CustomException.class, SQLException.class })- No Rollback on Check Exceptions: Conversely, if you want to suppress rollbacks for checked exceptions, you can use the
noRollbackForattribute.
- Rollback Rules: By default, only unchecked exceptions cause a rollback. You can customize this using the
In practice, using nested transactions and rollback rules effectively ensures that your application behaves predictably under various failure conditions, preserving data integrity and enhancing user experience. Understanding these features of the @Transactional annotation empowers developers to create reliable and maintainable applications in Spring Boot.
Best Practices for Using @Transactional Annotation
Harnessing the full potential of the @Transactional annotation in Spring Boot comes with certain best practices that can enhance the performance and reliability of your applications. By focusing on optimizing transactional management and effectively handling exceptions, developers can create a seamless experience for users.
Optimizing Transactional Management in Spring Boot
To ensure transactions are managed efficiently, consider the following best practices:
- Scope the Transaction: Keep your transactional methods as short and focused as possible. This minimizes the time locks are held on database rows and improves overall system performance. For instance, if you have a complex method that encompasses many database operations, consider breaking it down into smaller, more manageable methods.
- Use the Right Propagation: Carefully choose the appropriate propagation type according to your business logic. For instance, if you want to ensure that a new transaction starts independently of any caller, use
Propagation.REQUIRES_NEW. This approach can effectively isolate critical operations, avoiding unexpected data anomalies. - Set Isolation Levels Wisely: Understand and choose isolation levels that suit your application’s consistency requirements without sacrificing performance. For example, if you’re heavily reading data without frequent updates, a lower isolation level like
READ_COMMITTEDmay suffice. - Read-Only Transactions: For operations that do not alter the database (like fetching data), use the
readOnlyattribute. This optimization can help your database recognize that the transaction will not modify data, potentially improving performance.
Handling Exceptions and Rollbacks Effectively
Exception handling within transactional contexts is crucial for maintaining data integrity. Here are some strategies for managing exceptions and rollbacks:
- Define Rollback Rules: Utilize the
rollbackForandnoRollbackForattributes to precisely control which exceptions should trigger a rollback. For example, if a specific business exception occurs, you may want to handle it without rolling back:@Transactional(rollbackFor = { Exception.class }) public void processOrder(Order order) { // logic here } - Centralized Exception Handling: Consider implementing a global exception handling mechanism using Spring's
@ControllerAdvice. This way, you can manage exceptions arising from transactional methods in a centralized manner, improving code cleanliness and maintainability. - Log Errors Appropriately: If a transaction fails and a rollback occurs, it's essential to log this event. Logging provides valuable insights for troubleshooting purposes and helps monitor the application's health.
Remember, at the heart of effective transactional management is a balance between consistency and performance, along with a keen awareness of how exceptions affect your operations. By applying these best practices, developers can safeguard the integrity of their database interactions while fostering responsive and reliable Spring Boot applications.
Advanced Topics in Transactional Management
As developers become more seasoned in Spring Boot’s transactional management, exploring advanced topics can lead to more robust and reliable applications. Two key areas worth diving into are transactional isolation levels and the intricacies of using @Transactional with multiple data sources.
Transactional Isolation Levels
Transactional isolation levels define how transaction integrity is visible to other transactions and how data consistency is maintained in concurrent environments. Understanding these levels is critical for minimizing data anomalies while balancing performance. There are four primary isolation levels:
- READ_UNCOMMITTED: Allows dirty reads, meaning that transactions can read data that has been modified but not yet committed. While it's the most permissive and offers the highest performance, it can lead to significant data inconsistencies.
- READ_COMMITTED: Prevents dirty reads; however, it allows non-repeatable reads—when data changes between two reads within the same transaction.
- REPEATABLE_READ: Ensures that if you read the same row multiple times in a transaction, it will always return the same data. This level prevents dirty and non-repeatable reads but can result in phantom reads (new records appearing in subsequent reads).
- SERIALIZABLE: The strictest level, which ensures complete isolation from other transactions, effectively making each transaction appear as if it is executed in sequence. While very safe, this level can significantly impact performance.
Choosing the right isolation level is paramount. For example, in a highly concurrent environment where users frequently read the same data, READ_COMMITTED might be ideal to enhance performance without sacrificing too much consistency.
Using @Transactional with Multiple Data Sources
In complex applications, integrating multiple data sources becomes necessary—perhaps using different databases for operational and analytic processing. Enabling @Transactional across these sources can be done effectively with a bit of setup. To achieve this, you’ll need to:
- Define Multiple Data Sources: Configure each data source in your Spring Boot configuration files. This typically involves setting up two or more
DataSourcebeans in your configuration class. - Use Transaction Managers: Implement separate transaction managers for each data source, such as
JpaTransactionManagerfor JPA andDataSourceTransactionManagerfor plain JDBC. - Transaction Coordination: Utilize
@Transactionalat the service layer, making sure to specify which data source a particular transactional method is associated with. This could look like:
@Transactional(transactionManager = "firstTransactionManager")

public void methodWithFirstDataSource() {

    // logic accessing first data source

}

@Transactional(transactionManager = "secondTransactionManager")

public void methodWithSecondDataSource() {

    // logic accessing second data source

}
Handling multiple data sources this way gives the application fine-grained control over how transactions are managed across various services, ensuring atomicity and consistency when necessary. Embracing these advanced topics in Spring Boot’s transaction management not only enhances application performance but also equips developers to tackle complex enterprise scenarios with confidence. By understanding and implementing isolation levels and managing multiple data sources effectively, applications become more resilient and adaptable to changing business needs.
Featured Image Photo by Caspar Camille Rubin on Unsplash
Introduction to @Autowired in Java Spring Boot
What is Dependency Injection?
Dependency Injection (DI) is a design pattern that allows a developer to implement inversion of control, enabling the removal of hard-coded dependencies from application code. Instead of an object managing its own dependencies, DI allows them to be provided externally. This can lead to more flexible and testable code. For instance, consider an application where a Car class relies on an Engine interface. By injecting different implementations of Engine, developers can easily swap out the behavior without altering the Car class.
Overview of Spring Framework
The Spring Framework is a powerful tool that simplifies Java development through lightweight containers and comprehensive infrastructure support. It brings several features, including:
- Inversion of Control (IoC): Manages object creation and dependency wiring.
- Aspect-Oriented Programming (AOP): Supports separation of cross-cutting concerns.
- Data Access: Simplifies database operations with JDBC and ORM frameworks.
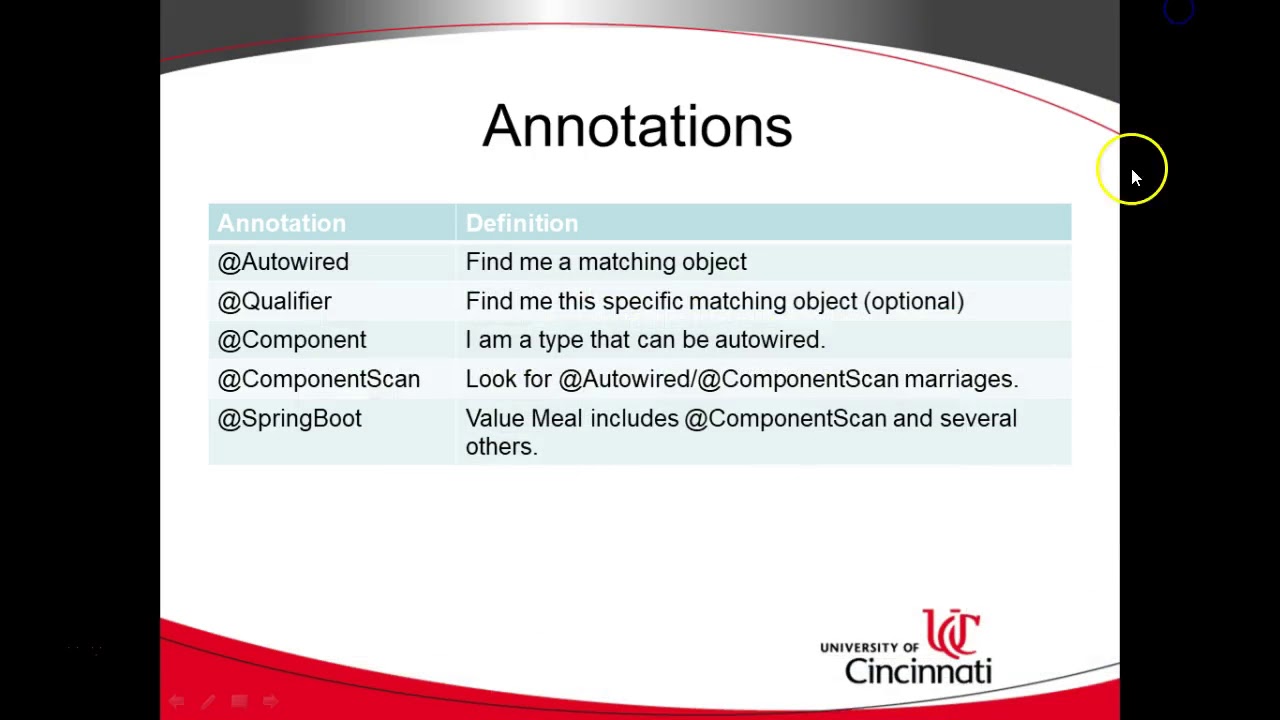
In the context of dependency injection, Spring’s @Autowired annotation automates the wiring of beans, making the development process not only faster but also cleaner. Imagine having to manually instantiate classes and manage dependencies, which can clutter your code. Spring’s DI helps maintain a clear separation of concerns, allowing developers to focus on business logic rather than boilerplate code.

Getting Started with @Autowired
How to Declare Dependencies using @Autowired
To leverage the capabilities of Spring for dependency injection with @Autowired, developers can easily annotate fields, constructors, or setter methods with this annotation. For example, if a class needs a service, you can declare it like this:
@Component

public class MyService {

@Autowired

private UserRepository userRepository;

// Additional methods...

}
This annotation allows Spring to manage the lifecycle and dependencies of the userRepository automatically.
Qualifiers and @Primary Annotation
When multiple beans of the same type exist in the Spring context, specifying which one to inject can be challenging. This is where @Qualifier and @Primary become essential tools:
- @Qualifier: Use this annotation alongside
@Autowiredto explicitly declare which bean should be injected. For example:
@Autowired

@Qualifier("specificUserRepository")

private UserRepository userRepository;
- @Primary: Marking a bean as primary allows Spring to default to this bean when no qualifier is specified. For instance:
@Bean

@Primary

public UserRepository primaryUserRepository() {

// Create and return the primary UserRepository bean.

}
Leveraging these features not only maintains clarity in your code but also prevents potential conflicts in dependency management.

Understanding the @Autowired Annotation
Constructor Injection vs Field Injection
Diving deeper into the @Autowired annotation unveils two primary methods for dependency injection: Constructor Injection and Field Injection. Each has its advantages and trade-offs, which can significantly influence how you design your Spring Boot application.
- Constructor Injection:
- Ensures that the dependency is provided at the time of object creation.
- Promotes immutability, as the dependencies cannot change after the object is created.
- Field Injection:
- Involves directly annotating fields within a class.
- Offers a simpler syntax, but can lead to difficulties in unit testing.
An example to illustrate: if a class requires a Service dependency, you can either inject it via the constructor, ensuring it’s always available, or use field injection, which is less verbose but can make testing a tad more complex.
Setter Injection and @Autowired
Another approach is Setter Injection. Here, @Autowired is applied to setter methods to inject dependencies after the object creation. This method offers flexibility in managing dependencies post-object construction.
- Benefits of Setter Injection:
- Dependencies can be modified or replaced easily.
- Facilitates optional dependencies, allowing certain components to be wired conditionally.
For instance, a UserService class may have a method to set a NotificationService that can change based on user preferences, showcasing the dynamic nature of setter injection. Using these varying techniques appropriately can sharpen your dependency management strategy in Spring Boot.

Benefits of Using @Autowired
Simplifying Codebase with Dependency Injection
One of the primary advantages of using the @Autowired annotation in Spring Boot is its ability to simplify the codebase significantly. By utilizing dependency injection, developers can effectively manage object lifecycles and dependencies, resulting in cleaner and more modular code.
- Reduced Boilerplate Code: Say goodbye to manual instantiation of beans.
- Improved Code Readability: With dependencies clearly defined, understanding relationships between components becomes effortless.
For instance, a service class using @Autowired can focus solely on business logic, leaving the burden of dependency management to Spring.
Easier Unit Testing with Mocking Frameworks
Another remarkable benefit of @Autowired is making unit testing much more manageable. Mocking frameworks, such as Mockito, allow developers to create mock objects to verify interactions without needing to start the full application context.
- Flexibility: Easily substitute real dependencies during tests.
- Improved Isolation: Test individual components independently, ensuring that each unit works correctly.
This approach not only enhances test reliability but also speeds up the testing process, allowing developers to complete testing cycles efficiently. In essence, @Autowired transforms testing from a chore into a seamless experience!

Common Errors and Troubleshooting @Autowired
Circular Dependencies
One of the common pitfalls when using @Autowired in Spring Boot is the dreaded circular dependency. This occurs when two or more beans require each other’s dependencies which can lead to a stack overflow or an unsatisfied dependency error. For example, if BeanA needs BeanB, and BeanB simultaneously requires BeanA, Spring struggles to instantiate these beans, leading to chaos. How to Resolve Circular Dependencies: - Refactor Your Code: Consider if the shared functionality can be moved to a third bean. - Use Setter Injection: This can sometimes help break the loop since beans can be instantiated without immediate dependency satisfaction.
BeanNotOfRequiredTypeException
Another issue developers might encounter is BeanNotOfRequiredTypeException. This exception arises when Spring tries to autowire a bean but fails because it does not match the expected type. For instance, if you declare a dependency of type List but attempt to autowire a Set, this exception will be thrown. To Troubleshoot This Issue: - Check Type Definitions: Ensure that your declarations and configurations match expected types. - Utilize @Qualifier: This can prevent ambiguity by specifying exactly which bean to autowire, thus reducing the chances of encountering this exception. Keeping these common errors in mind can help streamline the development process and enhance your experience with Spring Boot.
Using @Autowired with Different Bean Scopes
Singleton vs Prototype Scope
When working with the @Autowired annotation in Spring Boot, understanding bean scopes is crucial. The primary scopes are Singleton and Prototype.
- Singleton: A single instance is created and shared across the entire Spring container. It's ideal for stateless services where only one instance is needed.
- Prototype: A new instance is created every time it is requested. This is suitable for stateful beans where each use should not affect others.
For example, consider a logging service (Singleton) versus a user session (Prototype) in a web application.
Request and Session Scopes
Diving deeper, Request and Session scopes are particularly valuable in web applications.
- Request Scope: A new bean is created for each HTTP request. This is perfect for handling data that is relevant only for the duration of a specific request.
- Session Scope: A bean will be created for each user session. This is beneficial for storing user-specific data throughout their interactions with the web application.
Using these scopes effectively can significantly enhance the performance and manageability of applications by optimizing resource usage and maintaining proper data isolation.
Best Practices for Using @Autowired
Avoiding Ambiguity with Qualifiers
When working with @Autowired, ambiguity can often arise, especially if there are multiple beans of the same type. To avoid this, using the @Qualifier annotation is essential. This annotation specifies which bean to inject by name, ensuring clarity.
- Example: If both
DataSourceandAccountServicebeans exist:
@Autowired

@Qualifier("myDataSource")

private DataSource dataSource;
This approach not only resolves ambiguity but also enhances code readability, making it easier for others to understand your intent.
Using Autowired with Interfaces
In Java Spring Boot, injecting interfaces with @Autowired fosters loose coupling and enhances flexibility in your application architecture. This practice allows you to switch implementations with minimal changes to your codebase.
- Example:
@Autowired

private PaymentService paymentService; // PaymentService is an interface
By doing so, developers can seamlessly switch from one implementation of PaymentService to another without adjustment in core logic, thus promoting maintainability. This approach is particularly useful for projects that anticipate future changes or enhancements.
Advanced Tips and Tricks with @Autowired
Using @Autowired with Collections
When leveraging the power of @Autowired, it's not just limited to individual beans; it can seamlessly work with collections too. By injecting lists, sets, or maps, developers can manage groups of beans efficiently.
- Example with List: Consider a service requiring multiple notification strategies:
@Autowired

private List notificationServices;
- Each
NotificationServiceimplementation can be automatically included, allowing for dynamic handling of notifications.
Conditional Injection with @Autowired
Sometimes, a situation may arise where specific conditions dictate the dependency injection. Using profiles or qualifiers makes this process intuitive.
- Profile-based Injection:
@Autowired

@Profile("dev")

private DataSource devDataSource;

@Autowired

@Profile("prod")

private DataSource prodDataSource;
This ensures that the correct data source is injected based on the active profile, promoting cleaner configurations and enhancing maintainability. By mastering these advanced techniques, developers can elevate their Spring Boot applications to new heights!
Exploring Alternatives to @Autowired
@Resource Annotation
While @Autowired is a popular choice for dependency injection in Spring, the @Resource annotation provides a standardized approach that brings some advantages, especially when dealing with Java EE components. It allows developers to inject beans by name, offering greater control over the wiring process.
- Key Benefits of @Resource:
- Injects dependencies by name, enhancing clarity.
- Supports both setter and field injection seamlessly.
- Aligns well with Java EE standards.
For example, if a developer needs to use a specific DataSource bean, they can annotate the field directly with @Resource, making it clear which resource is being referenced.
@Inject Annotation
The @Inject annotation, part of the Java Dependency Injection (DI) framework, offers another alternative to @Autowired. It brings simplicity and flexibility while adhering to the JSR-330 standard.
- Advantages of @Inject:
- Provides a more lightweight approach to DI.
- Works seamlessly across different DI frameworks.
- Offers improved compatibility for Java EE applications.
Embracing @Inject allows developers to keep their code clean and highly interoperable. It also encourages best practices when integrating various frameworks within Java applications, helping to maintain modularity and testability.

Conclusion: Mastering @Autowired in Java Spring Boot
Recap of Key Concepts
Throughout this exploration of the @Autowired annotation, several key concepts have emerged:
- Dependency Injection: Simplifies the process of managing dependencies in an application.
- Different Injection Types: Constructor, setter, and field injections each have unique advantages.
- Common Issues: Understanding common pitfalls like circular dependencies is crucial.
By mastering these topics, developers can make their code more efficient and easier to maintain.
Next Steps for Further Learning
To continue expanding your knowledge of Spring Boot and the @Autowired annotation, consider the following pathways:
- Hands-On Projects: Implement @Autowired in a personal project to solidify your understanding.
- Explore Advanced Features: Investigate other annotations, such as @Resource and @Inject, to broaden your toolkit.
- Community Engagement: Join forums or local meetups to share experiences and learn from others in the field.
By diving deeper and engaging with the community, developers can truly master the art of dependency injection in Java Spring Boot.
I recently created a beginners guide to a simple Spring Boot project on my YouTube channel.
Here is the first video in that series - Fixing The Issues With The API
I recently created a beginners guide to a simple Spring Boot project on my YouTube channel.
Here is the first video in that series - Adding Repository Java Interface Files
I recently created a beginners guide to a simple Spring Boot project on my YouTube channel.
Here is the first video in that series - Create Many to Many Relationship For The Models
I recently created a beginners guide to a simple Spring Boot project on my YouTube channel.
Here is the first video in that series - Creating the models
I recently created a beginners guide to a simple Spring Boot project on my YouTube channel.
Here is the first video in that series - Add dependency and connection to PostgreSQL DB
I recently created a beginners guide to a simple Spring Boot project on my YouTube channel.
Here is the first video in that series - Create our project structure
I recently created a beginners guide to a simple Spring Boot project on my YouTube channel.
Here is the first video in that series - Setup The SQL Database and Tables
