
Introduction to @Autowired in Java Spring Boot
What is Dependency Injection?
Dependency Injection (DI) is a design pattern that allows a developer to implement inversion of control, enabling the removal of hard-coded dependencies from application code. Instead of an object managing its own dependencies, DI allows them to be provided externally. This can lead to more flexible and testable code. For instance, consider an application where a Car class relies on an Engine interface. By injecting different implementations of Engine, developers can easily swap out the behavior without altering the Car class.
Overview of Spring Framework
The Spring Framework is a powerful tool that simplifies Java development through lightweight containers and comprehensive infrastructure support. It brings several features, including:
- Inversion of Control (IoC): Manages object creation and dependency wiring.
- Aspect-Oriented Programming (AOP): Supports separation of cross-cutting concerns.
- Data Access: Simplifies database operations with JDBC and ORM frameworks.
In the context of dependency injection, Spring’s @Autowired annotation automates the wiring of beans, making the development process not only faster but also cleaner. Imagine having to manually instantiate classes and manage dependencies, which can clutter your code. Spring’s DI helps maintain a clear separation of concerns, allowing developers to focus on business logic rather than boilerplate code.

Getting Started with @Autowired
How to Declare Dependencies using @Autowired
To leverage the capabilities of Spring for dependency injection with @Autowired, developers can easily annotate fields, constructors, or setter methods with this annotation. For example, if a class needs a service, you can declare it like this:
@Component

public class MyService {

@Autowired

private UserRepository userRepository;

// Additional methods...

}
This annotation allows Spring to manage the lifecycle and dependencies of the userRepository automatically.
Qualifiers and @Primary Annotation
When multiple beans of the same type exist in the Spring context, specifying which one to inject can be challenging. This is where @Qualifier and @Primary become essential tools:
- @Qualifier: Use this annotation alongside
@Autowiredto explicitly declare which bean should be injected. For example:
@Autowired

@Qualifier("specificUserRepository")

private UserRepository userRepository;
- @Primary: Marking a bean as primary allows Spring to default to this bean when no qualifier is specified. For instance:
@Bean

@Primary

public UserRepository primaryUserRepository() {

// Create and return the primary UserRepository bean.

}
Leveraging these features not only maintains clarity in your code but also prevents potential conflicts in dependency management.

Understanding the @Autowired Annotation
Constructor Injection vs Field Injection
Diving deeper into the @Autowired annotation unveils two primary methods for dependency injection: Constructor Injection and Field Injection. Each has its advantages and trade-offs, which can significantly influence how you design your Spring Boot application.
- Constructor Injection:
- Ensures that the dependency is provided at the time of object creation.
- Promotes immutability, as the dependencies cannot change after the object is created.
- Field Injection:
- Involves directly annotating fields within a class.
- Offers a simpler syntax, but can lead to difficulties in unit testing.
An example to illustrate: if a class requires a Service dependency, you can either inject it via the constructor, ensuring it’s always available, or use field injection, which is less verbose but can make testing a tad more complex.
Setter Injection and @Autowired
Another approach is Setter Injection. Here, @Autowired is applied to setter methods to inject dependencies after the object creation. This method offers flexibility in managing dependencies post-object construction.
- Benefits of Setter Injection:
- Dependencies can be modified or replaced easily.
- Facilitates optional dependencies, allowing certain components to be wired conditionally.
For instance, a UserService class may have a method to set a NotificationService that can change based on user preferences, showcasing the dynamic nature of setter injection. Using these varying techniques appropriately can sharpen your dependency management strategy in Spring Boot.

Benefits of Using @Autowired
Simplifying Codebase with Dependency Injection
One of the primary advantages of using the @Autowired annotation in Spring Boot is its ability to simplify the codebase significantly. By utilizing dependency injection, developers can effectively manage object lifecycles and dependencies, resulting in cleaner and more modular code.
- Reduced Boilerplate Code: Say goodbye to manual instantiation of beans.
- Improved Code Readability: With dependencies clearly defined, understanding relationships between components becomes effortless.
For instance, a service class using @Autowired can focus solely on business logic, leaving the burden of dependency management to Spring.
Easier Unit Testing with Mocking Frameworks
Another remarkable benefit of @Autowired is making unit testing much more manageable. Mocking frameworks, such as Mockito, allow developers to create mock objects to verify interactions without needing to start the full application context.
- Flexibility: Easily substitute real dependencies during tests.
- Improved Isolation: Test individual components independently, ensuring that each unit works correctly.
This approach not only enhances test reliability but also speeds up the testing process, allowing developers to complete testing cycles efficiently. In essence, @Autowired transforms testing from a chore into a seamless experience!

Common Errors and Troubleshooting @Autowired
Circular Dependencies
One of the common pitfalls when using @Autowired in Spring Boot is the dreaded circular dependency. This occurs when two or more beans require each other’s dependencies which can lead to a stack overflow or an unsatisfied dependency error. For example, if BeanA needs BeanB, and BeanB simultaneously requires BeanA, Spring struggles to instantiate these beans, leading to chaos. How to Resolve Circular Dependencies: - Refactor Your Code: Consider if the shared functionality can be moved to a third bean. - Use Setter Injection: This can sometimes help break the loop since beans can be instantiated without immediate dependency satisfaction.
BeanNotOfRequiredTypeException
Another issue developers might encounter is BeanNotOfRequiredTypeException. This exception arises when Spring tries to autowire a bean but fails because it does not match the expected type. For instance, if you declare a dependency of type List but attempt to autowire a Set, this exception will be thrown. To Troubleshoot This Issue: - Check Type Definitions: Ensure that your declarations and configurations match expected types. - Utilize @Qualifier: This can prevent ambiguity by specifying exactly which bean to autowire, thus reducing the chances of encountering this exception. Keeping these common errors in mind can help streamline the development process and enhance your experience with Spring Boot.
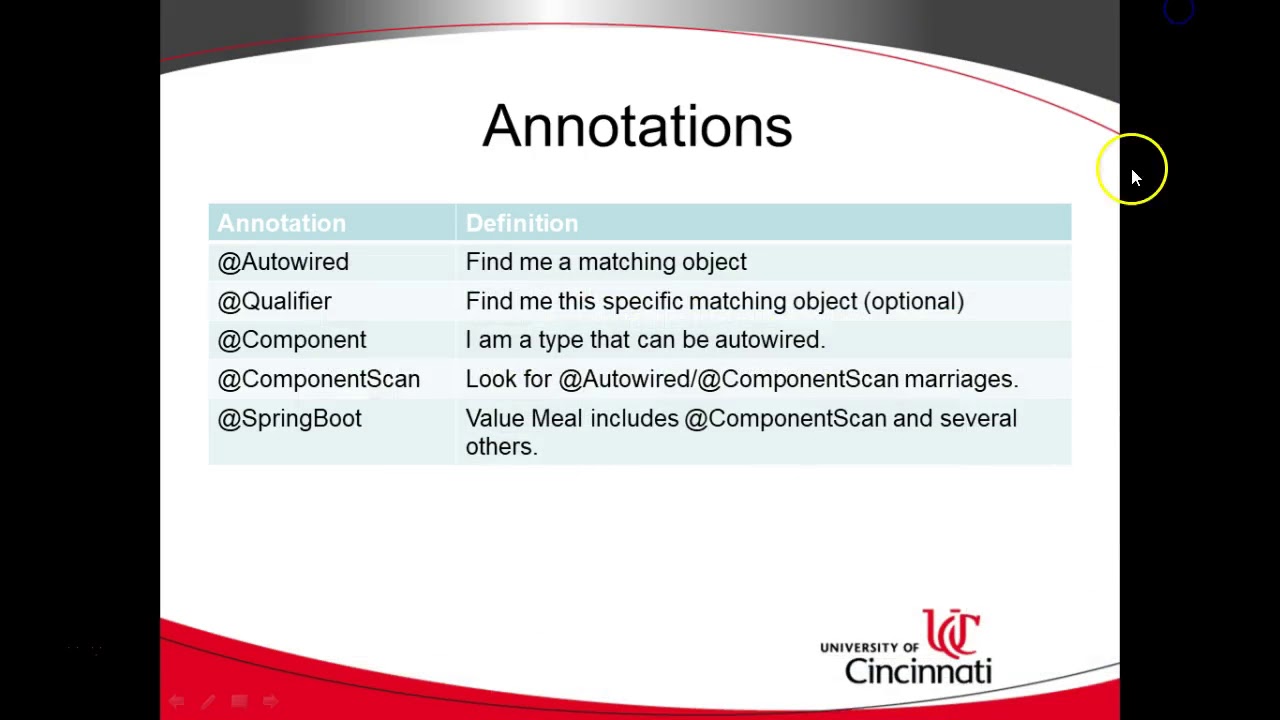
Using @Autowired with Different Bean Scopes
Singleton vs Prototype Scope
When working with the @Autowired annotation in Spring Boot, understanding bean scopes is crucial. The primary scopes are Singleton and Prototype.
- Singleton: A single instance is created and shared across the entire Spring container. It's ideal for stateless services where only one instance is needed.
- Prototype: A new instance is created every time it is requested. This is suitable for stateful beans where each use should not affect others.
For example, consider a logging service (Singleton) versus a user session (Prototype) in a web application.
Request and Session Scopes
Diving deeper, Request and Session scopes are particularly valuable in web applications.
- Request Scope: A new bean is created for each HTTP request. This is perfect for handling data that is relevant only for the duration of a specific request.
- Session Scope: A bean will be created for each user session. This is beneficial for storing user-specific data throughout their interactions with the web application.
Using these scopes effectively can significantly enhance the performance and manageability of applications by optimizing resource usage and maintaining proper data isolation.

Best Practices for Using @Autowired
Avoiding Ambiguity with Qualifiers
When working with @Autowired, ambiguity can often arise, especially if there are multiple beans of the same type. To avoid this, using the @Qualifier annotation is essential. This annotation specifies which bean to inject by name, ensuring clarity.
- Example: If both
DataSourceandAccountServicebeans exist:
@Autowired

@Qualifier("myDataSource")

private DataSource dataSource;
This approach not only resolves ambiguity but also enhances code readability, making it easier for others to understand your intent.
Using Autowired with Interfaces
In Java Spring Boot, injecting interfaces with @Autowired fosters loose coupling and enhances flexibility in your application architecture. This practice allows you to switch implementations with minimal changes to your codebase.
- Example:
@Autowired

private PaymentService paymentService; // PaymentService is an interface
By doing so, developers can seamlessly switch from one implementation of PaymentService to another without adjustment in core logic, thus promoting maintainability. This approach is particularly useful for projects that anticipate future changes or enhancements.
Advanced Tips and Tricks with @Autowired
Using @Autowired with Collections
When leveraging the power of @Autowired, it's not just limited to individual beans; it can seamlessly work with collections too. By injecting lists, sets, or maps, developers can manage groups of beans efficiently.
- Example with List: Consider a service requiring multiple notification strategies:
@Autowired

private List notificationServices;
- Each
NotificationServiceimplementation can be automatically included, allowing for dynamic handling of notifications.
Conditional Injection with @Autowired
Sometimes, a situation may arise where specific conditions dictate the dependency injection. Using profiles or qualifiers makes this process intuitive.
- Profile-based Injection:
@Autowired

@Profile("dev")

private DataSource devDataSource;

@Autowired

@Profile("prod")

private DataSource prodDataSource;
This ensures that the correct data source is injected based on the active profile, promoting cleaner configurations and enhancing maintainability. By mastering these advanced techniques, developers can elevate their Spring Boot applications to new heights!
Exploring Alternatives to @Autowired
@Resource Annotation
While @Autowired is a popular choice for dependency injection in Spring, the @Resource annotation provides a standardized approach that brings some advantages, especially when dealing with Java EE components. It allows developers to inject beans by name, offering greater control over the wiring process.
- Key Benefits of @Resource:
- Injects dependencies by name, enhancing clarity.
- Supports both setter and field injection seamlessly.
- Aligns well with Java EE standards.
For example, if a developer needs to use a specific DataSource bean, they can annotate the field directly with @Resource, making it clear which resource is being referenced.
@Inject Annotation
The @Inject annotation, part of the Java Dependency Injection (DI) framework, offers another alternative to @Autowired. It brings simplicity and flexibility while adhering to the JSR-330 standard.
- Advantages of @Inject:
- Provides a more lightweight approach to DI.
- Works seamlessly across different DI frameworks.
- Offers improved compatibility for Java EE applications.
Embracing @Inject allows developers to keep their code clean and highly interoperable. It also encourages best practices when integrating various frameworks within Java applications, helping to maintain modularity and testability.

Conclusion: Mastering @Autowired in Java Spring Boot
Recap of Key Concepts
Throughout this exploration of the @Autowired annotation, several key concepts have emerged:
- Dependency Injection: Simplifies the process of managing dependencies in an application.
- Different Injection Types: Constructor, setter, and field injections each have unique advantages.
- Common Issues: Understanding common pitfalls like circular dependencies is crucial.
By mastering these topics, developers can make their code more efficient and easier to maintain.
Next Steps for Further Learning
To continue expanding your knowledge of Spring Boot and the @Autowired annotation, consider the following pathways:
- Hands-On Projects: Implement @Autowired in a personal project to solidify your understanding.
- Explore Advanced Features: Investigate other annotations, such as @Resource and @Inject, to broaden your toolkit.
- Community Engagement: Join forums or local meetups to share experiences and learn from others in the field.
By diving deeper and engaging with the community, developers can truly master the art of dependency injection in Java Spring Boot.
As one of the most popular programming languages, Java has played a vital role in software engineering for over two decades. Its object-oriented design, platform independence, and dynamic capabilities make it an attractive language for the development of a wide range of applications. However, with all its advantages comes a downside in terms of the complex dependency relationships that can occur among Java classes. When a class relies on another class, it creates a dependency that affects the overall functionality and maintainability of the system.
In this blog post, we will delve into dependency injection in Java, explaining its concepts and providing code examples to demonstrate how it works. We will explore the different types of dependencies and their effects, the techniques for managing dependencies, and the best practices to avoid the potential pitfalls of tight coupling.
Whether you are a seasoned Java developer or a newcomer to the language, understanding dependency is crucial to building scalable, high-performance, and robust applications. So, grab your Java editor and coffee, and let's dive into the world of Java
Definition of dependency in Java programming
Dependency in Java programming refers to the relationship between objects or components within a program. A dependency occurs when one component relies on or uses another component in order to function properly.
In larger and more complex programs, dependencies can quickly become difficult to manage, leading to errors or inefficiencies in the code. Dependency injection is a common technique used in Java programming and other object-oriented languages to address this issue. It involves passing necessary dependencies into a component, rather than having the component create them itself. This approach helps to reduce tight coupling between components, maximize code reusability, and improve code maintainability.
To make it a little easier to understand, here is an example of Java code using Dependency Injection:
public interface GreetingService {
    void greet(String name);
}

public class GreetingServiceImpl implements GreetingService {
    public void greet(String name) {
        System.out.println("Hello, " + name + "!");
    }
}

public class MyApp {
    private final GreetingService greetingService;

    public MyApp(GreetingService greetingService) {
        this.greetingService = greetingService;
    }

    public void run() {
        String name = "John";
        greetingService.greet(name);
    }

    public static void main(String[] args) {
        GreetingService greetingService = new GreetingServiceImpl();
        MyApp app = new MyApp(greetingService);
        app.run();
    }
}
In this example, we have an interface GreetingService which defines a greet method. We also have a GreetingServiceImpl class which implements the GreetingService interface and provides an implementation for the greet method.
The MyApp class has a constructor that takes a GreetingService object as a parameter. It also has a run method which uses the greetingService object to greet a person named "John".
In the main method, we create an instance of GreetingServiceImpl and pass it to the constructor of MyApp. This is an example of dependency injection because we are injecting the GreetingService object into the MyApp object instead of creating it inside the MyApp object.
By using dependency injection, we can easily change the implementation of the GreetingService without changing the MyApp class. For example, we could create a new implementation of GreetingService that says "Bonjour" instead of "Hello" and pass it to the MyApp constructor without having to change the MyApp class.
The logger is a good example of dependency injection
Using a logger in your Java code is a good example of DI. We want to use the same logger through our code but also provide the option to change it at a later date. If you defined a logger in each class then you would have to change every class code if you changed the logger. With DI you only change the code where you pass in the logger class.
The Logger class is the dependency in this example. The MyClass class doesn't need to know how to create or configure a Logger instance; it just needs to know that it has a Logger instance that it can use.
public class MyClass {
    private final Logger logger;

    public MyClass(Logger logger) {
        this.logger = logger;
    }

    public void doSomething() {
        logger.info("Doing something");
    }
}
Another way to implement dependency injection in Java is to use the setter injection pattern. In this pattern, the class has a setter method that takes an instance of the dependency as a parameter. For example, the following class uses setter injection to inject a Logger dependency:
public class MyClass {
    private Logger logger;

    public void setLogger(Logger logger) {
        this.logger = logger;
    }

    public void doSomething() {
        logger.info("Doing something");
    }
}
In each of these examples, the logger class is passed into the class. So we would only have to change the code that either creates the class, in the first example or calls the setLogger method in the second example.
The MyClass class doesn't need to know how to create or configure a Logger instance; it just needs to know that it has a Logger instance that it can use.
Why is it best practice to use dependency injection in Java
Dependency Injection (DI) is a best practice in Java because it helps to decouple the components of a system, making it easier to maintain, test, and extend. Here is an example to illustrate why DI is beneficial:
Suppose we have a class called OrderService which depends on a class called PaymentService to process payments for orders. The OrderService class creates an instance of PaymentService inside its constructor:
public class OrderService {
    private PaymentService paymentService;

    public OrderService() {
        this.paymentService = new PaymentService();
    }

    public void processOrder(Order order) {
        // Process the order...
        paymentService.processPayment(order);
    }
}
This creates a tight coupling between the OrderService and PaymentService classes, which can make it difficult to test or replace the PaymentService with a different implementation.
However, if we use dependency injection to inject the PaymentService into the OrderService class, we can easily swap out different implementations of PaymentService without having to modify the OrderService class:
public class OrderService {
    private PaymentService paymentService;

    public OrderService(PaymentService paymentService) {
        this.paymentService = paymentService;
    }

    public void processOrder(Order order) {
        // Process the order...
        paymentService.processPayment(order);
    }
}
Now, we can create an instance of OrderService with any implementation of PaymentService that we want, without having to change the OrderService class:
PaymentService paymentService = new PayPalPaymentService();
OrderService orderService = new OrderService(paymentService);
By using DI, we have achieved loose coupling between the OrderService and PaymentService, which makes it easier to test and maintain our code, as well as easier to swap out dependencies with different implementations.
Best practices for effective dependency management in Java programming
Dependency injection is a powerful design pattern that can help you to write more modular and testable code.
Effective dependency management is crucial in Java programming, not only for developing efficient and maintainable software but also for keeping up with the latest trends and updates. One such practice is dependency injection, which is a software design pattern used to manage dependencies among different software components. In Java programming,
Spring Boot is one of the frameworks that provide an effective mechanism for identifying, injecting, and managing dependencies through the use of annotations and configuration files. However, it is important to keep in mind some best practices for effective dependency management in Java programming, such as avoiding circular dependencies, using interface-based programming, and maintaining a clear separation of concerns. By following these practices, developers can ensure that their software is scalable, maintainable, and robust in the long run. In this document titled "Dependency In Java Explained With Code Example", we will examine these best practices in more detail, illustrating them with code examples that demonstrate how to implement them in real-life scenarios.
In closing
In conclusion, understanding dependency in Java is crucial for writing efficient and maintainable code. By using proper dependency management techniques, developers can minimize the impact of code changes, ensure code reuse, and enhance the scalability of their applications. Additionally, modern frameworks like Spring have simplified the process of managing dependencies by providing tools and features that automate the process. As a result, developers can focus on writing high-quality code that is easy to maintain and update.
I was taking a look at Quora, something I try to do daily, and while browsing questions I came across this one:
What are some of the reasons why there are so many bad C++ programmers in the world?
This got me thinking. Are there that many? So, I decided to take a moment and write a response which was as follows:
From my experience I've worked with many good developers and some bad. I could provide a list of C programs I've had to go in and fix bugs, obvious bugs, for but I won't
The only bad programmers out there are those that won't learn from their mistakes. Making a mistake and covering a bug is part if the learning experience so I wouldn't call these bad programmers, just those learning.
But to had the question. The problem with C/C++ is that you can have too much control and so ut is easy to create bugs, especially when manipulating memory etc. Again, those that learn from the mistake are not really bad programmers.
Many languages out there will protect you from these mistakes and so that aside, it's probably ab equal number for every language out there.
Just my thought. It's just C/C++ is too powerful a language.
Now, let me say that I stand by this - well I wrote it so I have to. I truely believe that the only bad developers out there are those that choose to not learn from their mistakes.
Those that do not learn from there mistakes are destined to repeat the same mistake again and again.
So, to become a good developer you need to own and learn from any mistakes you make while coding.
Becoming A Good Developer
In order to become a good programmer, you need to learn from your mistakes. By learning from your mistakes, you will avoid repeating them. It's easy to learn from your mistakes when you make the same mistakes over and over again.
To become a good programmer, you should try to avoid making the same mistake twice. Most programming errors can be avoided by writing clean code. Writing clean code means that you should write clear and concise code. Code is often hard to understand for people who aren't familiar with it. It is also difficult for experienced programmers to understand.
I personally think this is more important that learning all the syntax for any 1 or more languages. Once you understand how a program fits together then the language is just syntax. Each language has its own structure and syntax but it follows the same rules for a program.
Learning to be a good developer is learning from the mistakes you make while coding in any language.
Just My Reasoning
These are just my thoughts, my reasoning from the past 26+ years of working in the IT industry as a developer, along with other roles. You may have your own thoughts and ideas, that are just as valid. I truly believe that its not the making of mistakes that are bad, but the not learning from them.
I'm a believer in having code reviews. I'm a beleiver of an iterative development approach. Learn from those mistakes and keep them away from production. Everyone makes mistakes when coding. As long as you learn from these mistakes, they won't be a problem. One of the most important things to remember about programming is to review your code. You will be able to find mistakes and flaws in your code if you do that. Code reviews are very important.
In order to become a good programmer, you need to learn from your mistakes. By learning from your mistakes, you will avoid repeating them. It's easy to learn from your mistakes when you make the same mistakes over and over again.
I finally did it, I completely deleted Windows from my Laptop and installed Linux.
Let me start by saying that this is not a short-term decision. I have been using Linux since 1995, so to date that is 28 years. When I first installed Linux on one of my desktops it was 94 floppy disks (or there about). It took quite a number of hours and booted to the command prompt. There were a number of UIs available - I tried many of them out but you need to install them from the command line and run them.
Today the Linux distros out there are much more polished. They are easier to install and there are so many distros to choose from. Currently, I have installed the latest Ubuntu, but I originally started with Slackware Linux 27 years ago now. And there were a few, well more than a few, others in between and may well be in the future.
Why did I delete windows and install Linux?
This is probably a question you are asking if reading this post. The simple answer is the freedom, convenience, and reliability of Linux.
Freedom is because of the sheer number of distros out there. I can try different distros, each with its own uniqueness.
The number of choices available in the world of Linux has grown exponentially in the past twenty years that I have been using Linux. There are now many different distributions of Linux available. Each one has its own unique character, which gives it a distinct personality. There are thousands of Linux distributions, each one designed to solve a particular problem. Each distribution offers a different set of applications, so you can find exactly what you are looking for in the software selection offered by your Linux distribution.
Convenience is also partly down to the number of distros but a little more than that. You can customize your Linux system to meet your needs far more than you can with Windows, from my own experience. There are many apps available in their own app installer, free apps. It can be an eye opener at times to how many apps there actually are and are free.
Reliability. The system was just so reliable. I didn't want to lose my data. I also had so many programs that I couldn't afford to have them all crash. I personally find I have very few crashes running Linux than I do with Windows. Another thing to talk about is when I install an update in Linux, I very rarely have to reboot the machine. Since installing just Linux, for each update I have had I have never had to reboot the machine for it to take effect.
On top of these 3 points, I just love using Linux. Gone are the days of having to know complex command line instructions. The modern GUIs running in Linux allow you to do most everything point and click as with Windows and other operating systems.
Can I develop applications under Linux?
One of the best things for me under Linux is the power and flexibility of writing code. It's as easy to write apps for web browsing, email, instant messaging, games, and so much more as under other OS out there. There are many code-writing tools to use, all the big ones you can run on Windows are also available under Linux. It's just that I find it more stable to write code on Linux because of just how reliable it is.
I absolutely love developing under Linux personally, it just feels more like a developer's environment as opposed to most other OS. I've always been afraid though of completely removing Windows from my desktop thinking that I would not be able to get all the tools I needed, but how wrong could I have been! Not only do I have all the existing tools I used but found many more to use.
It's stable. It has all the tools. You can run many virtual environments. It's the perfect, in my opinion, OS to develop applications in.
The obvious, cost
Let's talk about the obvious benefit, costs, or lack of any. The OS itself is free to install. You don't have to pay for it, and many of the apps you would want to run are free too. Most people who pay for a distro are paying for the support costs and not the OS itself. If you think you can run without any of these then you will install all at no cost.
Let me tell you a little story. A number of years ago now, before Linux was this polished, I handed over an older laptop to both my dad and mother-in-law. Neither had computer experience. Both these laptops were only running Linux. Neither of them had any problem using Linux for their daily usage. In fact, I felt more secure for them as they would not have to worry and deal with all the viruses and security issues that are related to many other OS out there.
If you are trying to save money, you should consider not buying a distribution that requires you to pay for support. That's because the support costs are normally high. It's true that you may be able to fix some of your problems yourself, but that won't be the case for everything. Many issues you may face will have solutions on the Internet, just follow the how-to of these experts and generally, this will fix the issues if any. Generally, though, I find that I very rarely run into any issues running Linux.
So, in conclusion
We all have our own reasons why we do something. Sometimes we do things just to fit in with others. This is true for people who are using different operating systems. They will often use Windows in order to fit in with the people around them. There are people who have very strict and difficult jobs that they believe they can only do on Windows.
For me personally, it just made sense to install Linux on my personal machine. I don't play many games, and to be honest with Wine you can run many of them today. Wine is an emulator that allows you to run many Windows games and apps.
Cost wise made sense, being free. Being able to try out many distros and then customize them to me made sense. Being so stable made sense. Having all the tools for development made sense. It just made enough sense that I wiped away Windows and are only running Ubuntu Linux (the distro may change in the future).
If you have not tried Linux, then you can run it alongside Windows. You can often also run and try it from the DVD or USB stick installer. You can get a feel if it is for you. Personally, it's been a long time coming for me to just go Linux. My last role and the laptop there having just Linux finally pushed me over the line.
